Saturday, 1 June 2013

Benefit concealer comparison for fair skin. Boi-ing, Fake Up & Erase Paste

I have very pale skin and there are so many concealers out there in a bazillian shades so which will suit you best? Here I have compared my favourites in the lightest shades that Benefit make.

From left to right in the swatch they are:
1. Erase Paste shade fair
2. Boi-ing shade 01
3. Fake Up shade light

Even though they are all the same brand the colours and textures are very different, so it is best to try out samples before committing to a full size product. You can do this by trying out the product at your local Benefit counter for free.

Erase Paste: 4/5 - best at brightening the eye area.

Pros - This is a amazing concealer for under the eyes as it brightens as well as conceals. It really does make the dark circles and discolouration dissappear and leaves the eye area looking more bright and youthful.
Cons - I find it creases really bad and that I have to constantly smooth it out under my eyes throughout the day. Also it not the best at covering blemishes compared to the other two.

Boi-ing: 5/5 - best coverage.

Pros: This is my favourite concealer and my go to product on a daily basis. I really need to buy the full size product of this one.
This concealer as described by Benefit is industrial strength and it lives up to its name. It is more matte than the other two which I love as no one wants to looks shiny. This conceals the dark circles under the eyes flawlessly it looks very natural and matches my skin tone perfectly. This one is the best at covering blemishes and any red areas around the nose, as any discolouration instantly dissappears.
Cons: it does crease a little bit under the eye.

Fake Up: 3/5 - best at not creasing.

Pros: This has the prettiest packaging and is perfect for carrying around in your handbag for any daily touch ups.
Unlike the others it moisturises the skin as well as concealing what a nice bonus. The best thing about this concealer as unlike the other two it doesn't crease under the eye which is great!. Also the colour matches my skin tone better than the Erase Paste.
Cons: for me this doesn't give the best coverage it is like a mixture of the other two. It doesn't give as good coverage as Boi-ing but it does brighten a bit like the Erase Paste. It is definitely a good concealer and I would still recommend it but for me it isn't as good as the other two.

Please let me know what you think is the best concealer for you and why. I hope I have helped some undecided ladies which concealer to get who are pale like me.

How to get defined eyebrows with Benefit Brow Zings + Highbrow

As I have mentioned before I just used to pluck and occasionally get my eyebrows waxed to keep them nice and trim. Back then it was fashionable to have tiny thin eyebrows but now the bolder brow is back in fashion as we all know.

So to get beautiful brows you will need:
1. Tweezers
2. Eyebrow comb/brush
3. Eye brow styling kit such as Benefit Brow Zings containing eyebrow wax, powder and a angled make up brush.
4. Brow highlighter, I use the Benefit High Brow stick.
5. Cotton buds and makeup remover.

Step one - Get Plucky So I tweezer my brows almost daily to keep them looking the shape I want. If you want a new shape I would recommend going to a brow bar and to let the professionals do it.

Step Two - Brush Before applying any make up to the brows it is important to brush them to keep them looking neat and to make sure all the hairs are facing the correct way. Also after tweezing this removes any stray hairs that have been left behind.

Step Three - wax & powder With my Brow Zings kit I first of all users the hard angled brush that comes with it and sweep it in the wax and then the powder and tap off any excess.
Starting from the inner corner outwards I apply at a slight upwards angle up to where I want the arch to be.
I sweep it around to form the arch that I want and then angle it from there outwards for the last flick. For more definition I use some more product sweeping the same brush held horizontal and fill in any sparse parts of the brow in little sweeps going along the brow imitating hairs. This helps to keep the brow looking natural.

Step four - more powder After this I use the powder brush that comes with my kit and sweep it in the powder only again tapping off any excess.
I start from the inner corner again a little bit more inwards than last time letting my brow take the shape of the brush which is the perfect size to start off your eyebrow.
I sweep up to the arch and then again changed the brush angle to get the narrower small last bit of brow which is angled inwards towards my eye.

Step five - wipe away any mistakes I then use a cotton bud dipped in makeup remover to clean up my brow lines and keep them looking sharp.

Step six - highlight I then use the Benefit High Brow stick to apply a small amount of product all the way under the eyebrows, then gently smudge it along with my finger blending it together. This is my new must have products as it makes loads of difference to your face. It lifts your eyebrows up and makes them look great.

Step seven - practise makes perfect it has taken me quite a few months to get the hang of this and if I have missed doing it for a few days I feel a bit rusty again so get practising and soon you will be able to do it with your eyes closed, well maybe not but you get the idea.

Also if you are looking for a guide how to shape your eyebrows to suit your face then check out Benefits eyebrow mapping guide here as I found this really helpful.

I also plan to do a YouTube video demonstration on this soon as it is hard to explain so please look out for it ladies x

Friday, 31 May 2013

My skincare routine with Benefit B. Right range

After trying out some of Benefit travel size skincare products I decided to get some of them full size to use everyday. Here is my daily skincare routine.

Sometimes I do this routine morning and night sometimes it's just at night time only. This depends on how much make up I've been wearing the day before as I can use make up remover on my eyes, wash my face use make up remover again, sleep and I still have panda eyes when I wake up. The Benefit They're Real mascara is relentless to get off.

Anyway step one: I use a Nivea gentle make up remover blotted onto cotton pads and then I use this to remove any eye makeup.

Step two: I wash my face with the Benefit cleansing facial wash. I absolutely adore this as it smells so fresh and amazing. It's simple and foams very quickly you don't need to use much. A full size tube has lasted me about 5 months. Dry with towel. I picked this face wash over the facial scrub as I found that too rough for daily use as I prefer this gentle wash.

Step three: repeat step one as my eyes are resembling panda ones at this point.

Step four: Benefit toner. I splash a bit of this on my face and if I've used too much I dab the excess off with a cotton pad. It usually soaks in nicely though. This stuff feels really smooth. I'm not sure what it does but my face always feels so much cleaner after using this.

Step five: it's potent, this little pot of wonder by Benefit is one of my favourites. It's nice and delicate and I use this around my eye area. It helps to keep the area looking naturally bright and smooth.

Step six: finally I use the Benefit Total Moisture cream on my face and neck. Compared to all the other moisturisers I've tried this is my favourite as it soaks In immediately it's like my skin is drinking this stuff down. Also it isn't greasy and it smells great. As I've mentioned in a previous post that since I have been using this skincare range I have been complemented on my 'glowing complexation'. This moisturiser won hands down over Benefits triple emulsion cream as I found that greasy and it didn't soak in very well.

Overall I love this skincare collection and I will be gutted when it is discontinued as it is perfect for my skin. So I would recommend trying out the different sample products out there before committing to a pricey full size one.

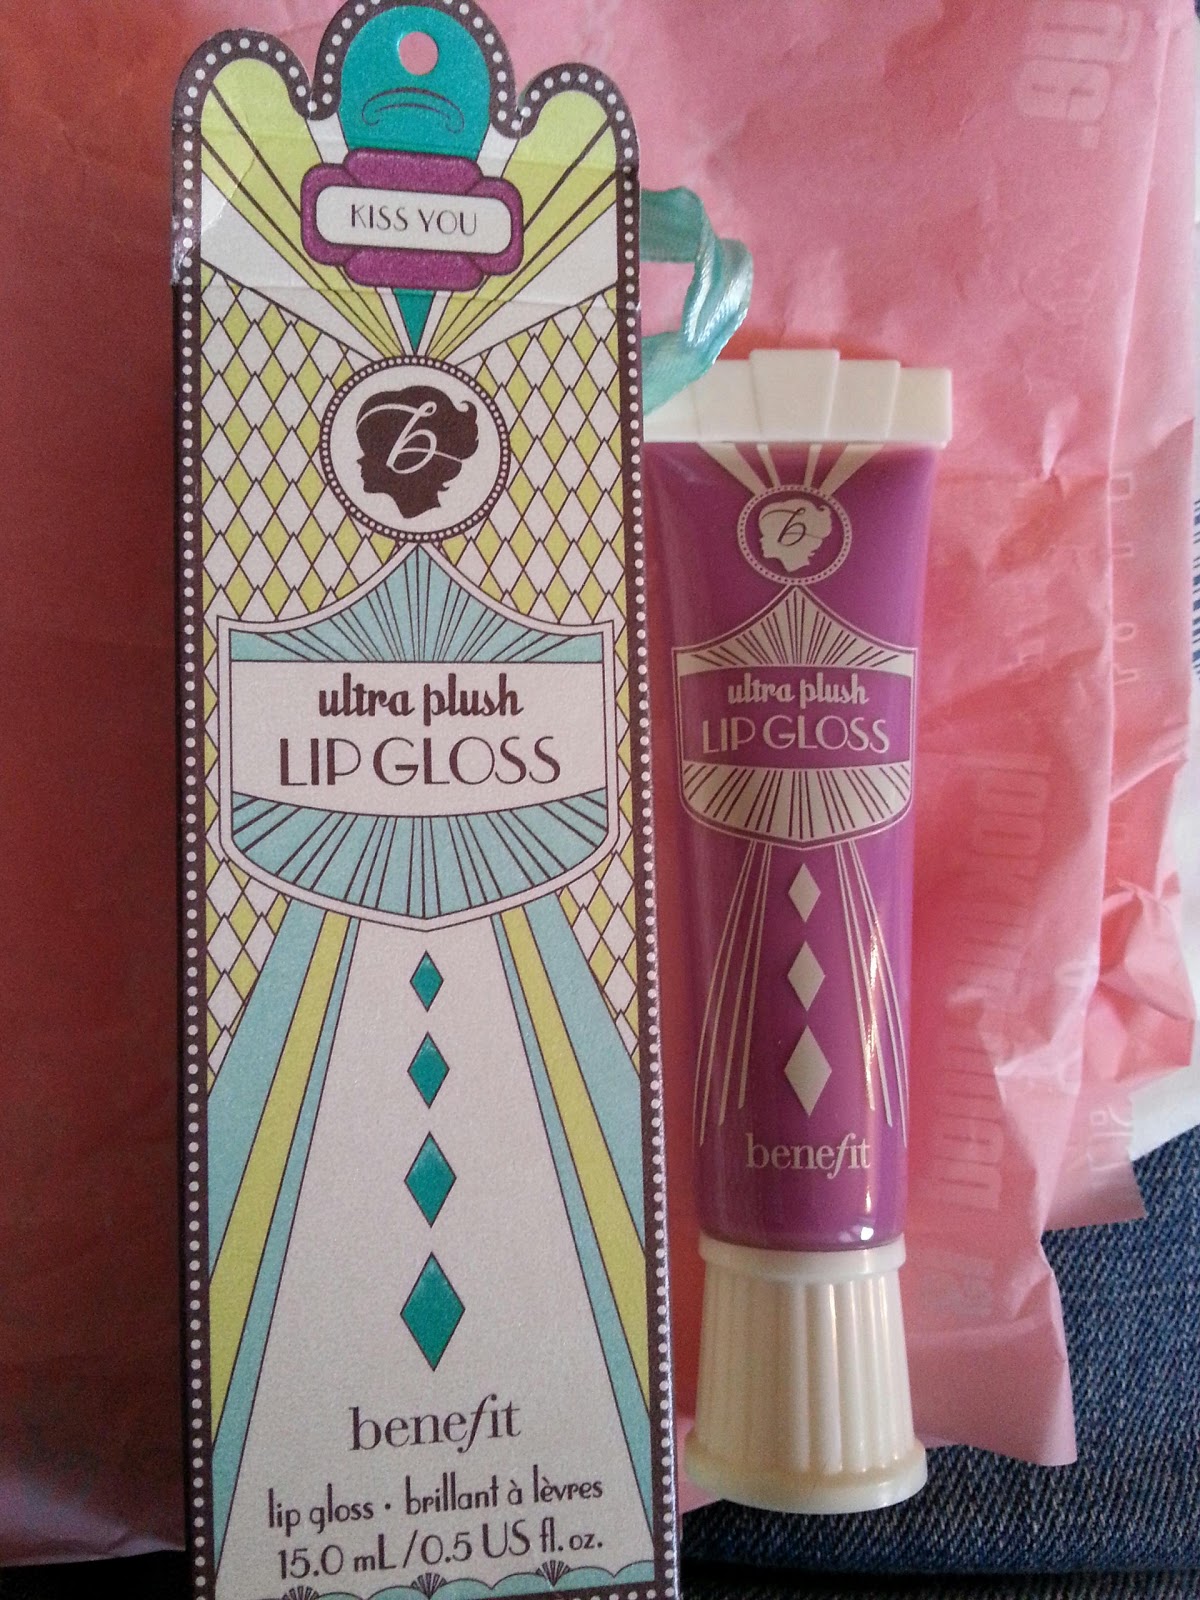
Benefit Ultra Plush Lipgloss - Kiss You

Hi

I was lucky enough to get this lip gloss for free by winning a Facebook competition. It was called the Colour Me competition for the launch of the new Benefit Colour collection which includes powder and creme shadows and lip glosses in lots of beautiful shades. I won the Ultra Plush lip gloss in the shade Kiss You.
It came in the most gorgeous packaging as everything Benefit does. The packaging is art deco inspired and it looks great before I've even tried it out on my lips.

My first glance at the purple tube and i thought oh no its too dark. But after trying the colour out I was pleasantly surprised that it goes on a candy pinky purple colour which isn't too dark for my pale completion at all.
Because of the colour of the bottle and swatch photo on the website I would never even try out a tester of this colour if it was in front of me in store as I would automatically assume that it would be too dark but it has really opened my eyes to try shades that I usually wouldn't touch.

A pet hate for me and my husband is sticky lip glosses, you don't want your hair and face getting into a sticky mess with one gust of wind and my husband refuses to kiss me with lip gloss on in the past as it was sticky. Fear no more ladies this lip gloss has a new no sticky formula and I can vouch for it. It is lovely and soft and smooth and most importantly not sticky. This shades gives my face a lovely pop of colour as I like the rest of my make up to be quite neutral. The colour is also great for daytime and work as it isn't too bright I would say it is just bright for daytime glamour.
Thank you Benefit for my lip gloss I will definitely get my wear out of it.

Tuesday, 9 April 2013

Irregular Choice Mermaid Open Toe red patent shoes

I have just purchased some of these and I am already in love with them! I love the style as they are perfect for my "pin up" 50s look without wearing massive heels. I'm not a fan of massive heels mainly because I can't walk in them and the fact that my husband is the same height as me 5'6 and I don't want to be towering over him. The heels on these are about 2 1/2 inches so it's a good height.
They are bright pillar box red to match my favourite lipstick and they are super comfy what more do you need.
The only downside is the strap doesn't adjust so if you have wide or fat feet they aren't going to fit in them.

The icing on the top is the cat print sole which is amazing in itself it's a shame it will get worn down it looks so cute!.
These come with spare heels and packaged in a bright girlie box. Overall these are a winner for me I now want them in more colours!
I plan to dress these up with a leopard print wiggle dress and red patent handbag or dress then down with skinny jeans.
I can't wait to break these shoes in.

Monday, 1 April 2013

Which Benefit primer is best?

Benefit have a few primers out and they are all fabulous but if you are struggling to choose one, I will try and help.

On the pictures they are from left to right: Porefessional, That Gal and Girl Meets Pearl.

They each do different things:

Porefessional - This is my favourite as the colour is perfect for my skin. It is a light beige and even though it's a primer it works so well for me I don't need to wear foundation. As you have probably guessed from the name it minimises the apprentice of pores. I don't have a clue how it works I know that it just does, and it does it well. A little bit of this goes along way too. It feels very silky smooth and light on the skin. If you feel you need touch ups throughout the day you can pat on over make up for a instant perk me up. You can use this on all of your face concentrating on your t zone as this is usually where the most visible pores are.

That Gal - This stuff smells of strawberrys and it a thicker cream than the Porefessional. It is pink in colour and is used to brighten the face if you are having a dull day. This stuff is really good and is best worn under foundation but can be worn on top of foundation or alone. This can be mixed with Girl Meets Pearls for bright pearly cheeks so there would be no need for blusher.

Girl Meets Pearl - This is a highlighting primer and this is my least favourite of the 3. This is pink out of the tube but has gold highlighting tones. It is very nice but just not for me. It is best mixed with foundation or blusher for a subtle glow on either your whole face or cheeks. As this is mostly a highlighter I don't really use it as I have Watts Up and Highbeam which I prefer. I think this primer is more suited for darker skintones. It is very nice and gives your face a second glow so maybe save it for party's.

So out of the 3 Porefessional is my favourite and more suited to my fair skin. It is my favourite primer for everyday wear. That gal is great for cheating your way to a bright healthy glow if you have had a heavy night the evening before.
I have recently got Dr Feelgood which is also a priming balm so I will review this soon as I haven't tried it out yet.

Let me know what your favourite is?

Thursday, 28 March 2013

How to spot a fake Benefit Powda Wowza blusher

There are a lot of fake Benefit products on ebay and I have been stung a few times now. Firstly with the Smokin Eyes kit and now with the Powda Wowza so to warn others I have kept the fake one here to compare with the genuine one bought from Benefit.

The first thing to look for is the genuine quality of the packaging and product as Benefit is always very good quality. Especially on ebay be wary if it says no box, no brush or damaged box. Sometimes they say they are seconds which is probably untrue it's just a way of disguising the shabby quality of the product. This Powda Wowza seems like a good fake but if you know what to look out for you can easily spot a fake. Luckily I got a refund for this product.

Differences between the genuine and fake:

Box - on the fake the ink isn't printed very good and is smudged. The big give away is where it says 'peel me' in the corner to reveal the product info as on the genuine it is a sticker and peels back easily to reveal the ingredients underneath. On the fake it doesn't peel and rips off untidily.

Lid - inside the lid of the real box the pattern follows through onto the inside lip where as on the fake there is no pattern. 

Brush - The fake brush bristles are terrible quality and look very messy. They are all different lengths. The real brush is a bit smaller but good quality with neat bristles. Also the real one comes in a plastic packet inside the box the fake does not.

 Smell -This is the biggest difference as the real blushers smell very fragrant and fruity smelling where as the fake smells a bit chemically. The powders look very similar in colour and they are all shimmerey.