Thursday, 6 June 2013

My summer must haves...

So summer has finally arrived but probably not for long but here is my favourite summer looks than I plan to be sporting on these hot sunny days.

1. Suncream: I don't want a tan I like being pale and interesting. Anything that Dita does is good enough for me.

2. Cat eye sunglasses: preferably in black. I have fell in love with some Chanel ones as they are amazing but whilst I am fantasising about those I will be picking some up from the high street that I can actually afford.

3. Maxi skirts: these are so much more comfortable that skinny jeans. Long and flowy or tight and clingy it doesn't matter the maxi skirts are in and look fab.

4. Bright lip: I'm thinking a bright pink as it will help to put me in a summery mood.

5. Metallic sandal: I know the wedge sandals are in but so are metallics and I'm not a fan of the wedge sandal they look a bit ugly. I will be rocking a metallic flat sandal. I got the perfect ones from George at Asda late last year and I can't wait to finally wear them.

6. Leather jacket: any colour will do the brighter the better, but as I'm guessing the sun won't be sticking around for long it's good to carry a cover up to prevent getting chilly.

What are your summer wardrobe must haves? Let's discuss...

Monday, 3 June 2013

Inside my crazy obsession with Benefit Cosmetics

So you have probably guessed by now that I am more than a little bit obsessed with Benefit Cosmetics so as requested here is a break down of my collection -

Skincare:
Cleansing facial wash
Toning Lotion, full size + a miniature bottle.
It's Potent eye cream, full size, a miniature + 2 sample sachets.
Total Moisture

Primer:
Porefessional, full size + a travel size.
Dr Feelgood miniature
That Gal, full size + a travel size
Girl Meets Pearl.

Concealer:
Erase Paste - Fair
Fake Up - Light

Foundation:
Some Kind of Gorgeous - Lite
Hello Flawless powder - Ivory

Blusher:
Hervana
Fine One One
Benetint mini
Cha Cha tint mini

Highlighter:
Watts Up
Highbeam mini

Eyes:
Magic Ink Liquid Eyeliner - Black
Bad Gal Waterproof Liner - Black
Bad Gal Lash mascara - Black
They're Real Mascara -Black, travel size X 2
High Brow - Linen Pink
Eye Bright stick
Velvet Eyeshadow - Dandy Brandy
Velvet Eyeshadow - Nice Melons

Lips:
Coralista Lipgloss
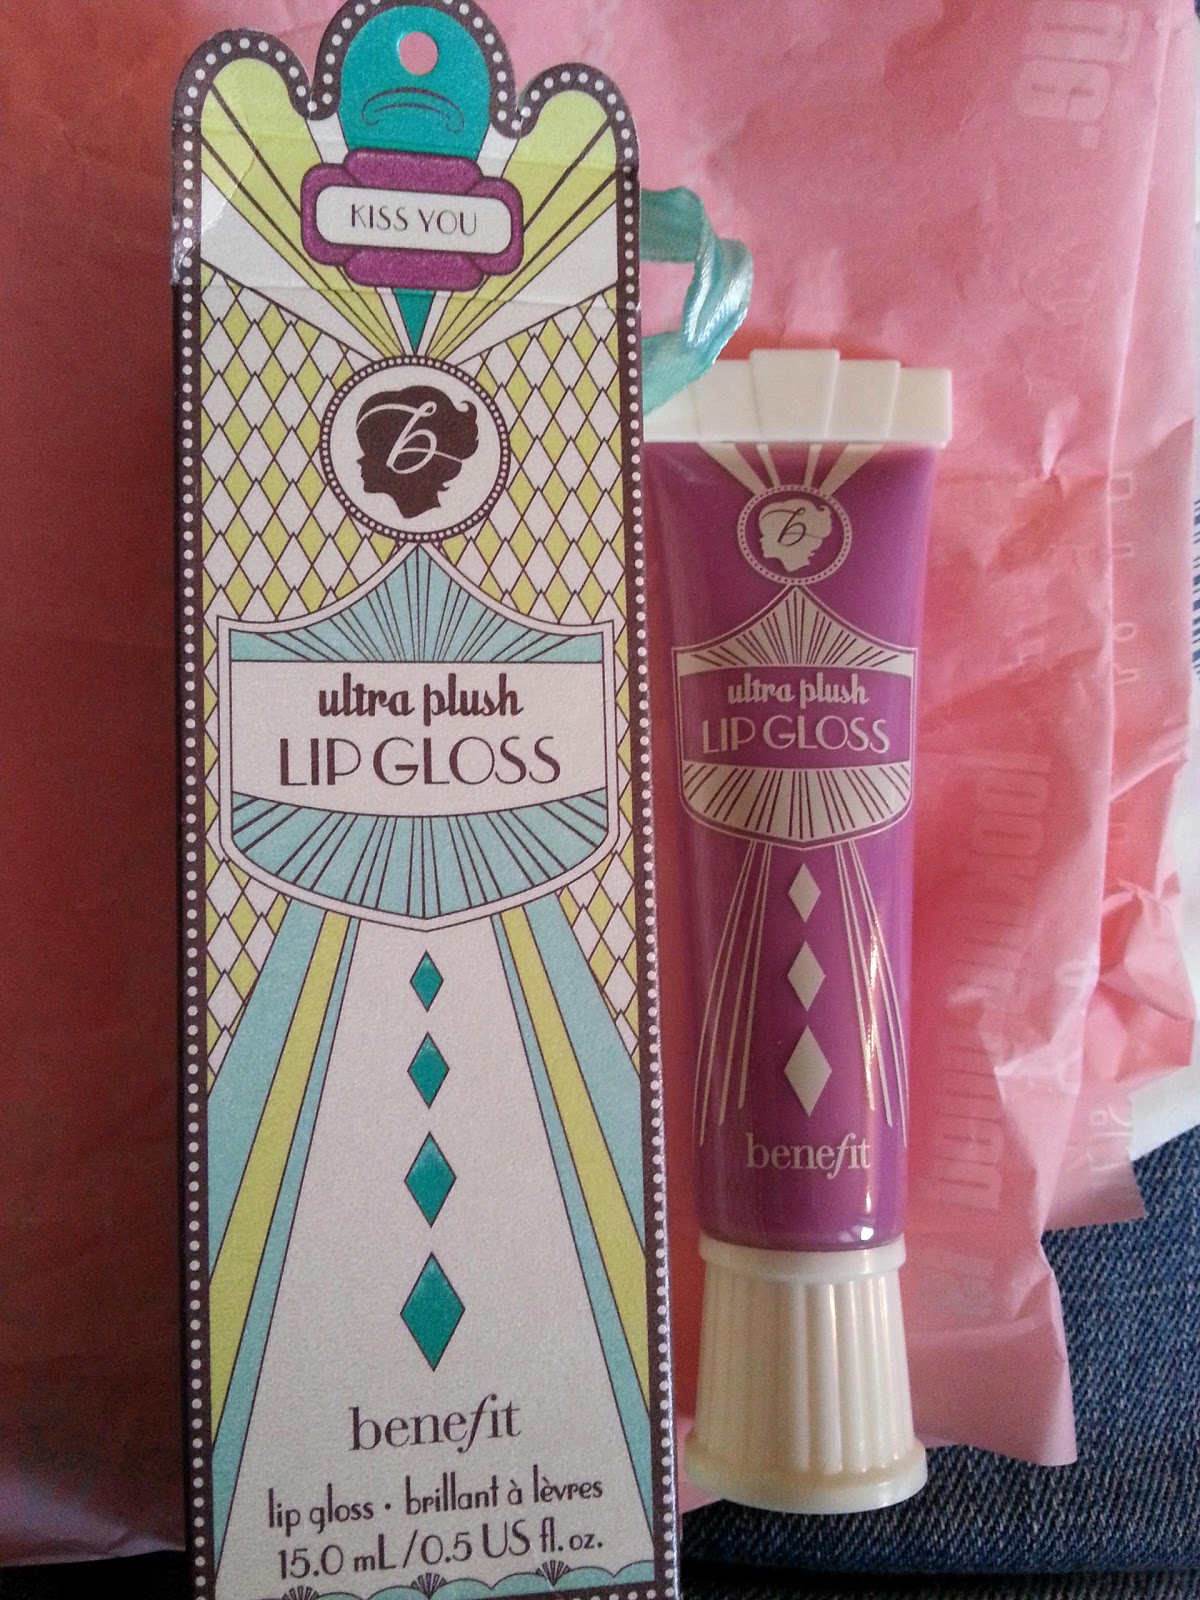
Ultra Plush Lipgloss - Kiss You
Life on the A List Lipgloss

Beauty Kits:
Confessions of a Concealerholic - Boi-ing 01 & 02, Lemon Aid, Eyebright and 2 brushes. It did have a mini That Gal and mini Erase Paste medium in there when it was new also.

Brow Zings - dark powder and wax, brushes and tweezers.

Powda Wowza - Coralista, Bella Bamba blushers & Dallas bronzer.

Peek a Bright Eye's: light base shadow, brown contour and liner shadow, pearl pink highlight shadow, eye Bright with brushes.

Smokin Eyes: pink highlight shadow, pewter base shadow and a deep charcoal shadow, smokin liner, eye bright, brow zings wax, tweezers and brushes.

World Famous Neutrals - world's most glamorous nudes. 2 X creme shadows: birthday suit and my two cents.
4 X powder shadows: call my buff, it's complicated, kiss me, I'm tipsy and gilt-y pleasure.

She's So Jetset - first class face powder (blusher + highlighter), 4 eyeshadows champagne please, gold card, pretty in mink and elegant espresso. This set included my mini porefessional, life on the A list gloss and a mini they're real mascara.

Storage:
Benefit Beauty Bag, large travel size
Beautiful Bermuda Betty, small.

My top 10 favourites that I couldn't live without are:
1. Boi-ing
2. Brow Zings
3. Coralista
4. Total Moisture
5. Magic Ink
6. Peek a Bright Eyes
7. They're Real
8. Eye Bright stick (perfect for on the go).
9. Hello Flawless powder
10. High Brow

Sunday, 2 June 2013

Benefit box o powder blusher comparison - Hervana, Coralista & the Bella Bamba

I love all of these powder blushers by Benefit and I love having more than just my one favourite, as I can wear different shades depending on my mood.

I have tried out other Benefit blushers as I have the cream Fine One One and the liquid Benetint and Cha Cha Tint but for me they don't compare to the powder ones. These powder blushes are beautifully pigmented that have a slight shimmer to them which doesn't make them look cheap. The colours last all day and really make the cheeks stand out without looking slutty.

1. Hervana 4/5 - this is the first powder Benefit blusher that I bought and it makes a great first impression as the packaging is perfectly cute as always and it comes with a good quality brush. Also it smells amazing!
This blusher gives a subtle rose pink blush that needs a few layers to build up the colour depending how deep you want it. I love how you make the colour yourself by blending together all the different colours in a swirl as I've never seen that before. Also the fact that you could use the colours individually as eye shadows swayed me over to buying this one.

2. Coralista 5/5 - To try out the other shades of powder blushes that Benefit do I decided to buy the Powda Wowza set that contained three for me to try. This was in that pallette and I can honestly say that this one is hands down my favourite and I tend to wear it daily. I will definitely be buying a full size version of this. It is such a beautiful colour that works on any skintone. I love how it isn't too pink.

Bella Bamba 3/5 - this was also in the Powda Wowza pallete that I bought and it is a beautiful colour but my least favourite as it is too bright for my skintone to wear everyday. It also sparkles more than the others which puts me off. It would be great for a night out but seeing as I don't go out much these days it won't be getting much use from me.

In the swatches they are from left to right - Hervana, Coralista and Bella Bamba I have taken pictures with and without the flash as it gives a better look at the colour differences. To show the Hervana's colour I have layered it up more than I usually would when I wear it on my face as it is quite a light pink. Which box o powder is your favourite?

Saturday, 1 June 2013

Benefit concealer comparison for fair skin. Boi-ing, Fake Up & Erase Paste

I have very pale skin and there are so many concealers out there in a bazillian shades so which will suit you best? Here I have compared my favourites in the lightest shades that Benefit make.

From left to right in the swatch they are:
1. Erase Paste shade fair
2. Boi-ing shade 01
3. Fake Up shade light

Even though they are all the same brand the colours and textures are very different, so it is best to try out samples before committing to a full size product. You can do this by trying out the product at your local Benefit counter for free.

Erase Paste: 4/5 - best at brightening the eye area.

Pros - This is a amazing concealer for under the eyes as it brightens as well as conceals. It really does make the dark circles and discolouration dissappear and leaves the eye area looking more bright and youthful.
Cons - I find it creases really bad and that I have to constantly smooth it out under my eyes throughout the day. Also it not the best at covering blemishes compared to the other two.

Boi-ing: 5/5 - best coverage.

Pros: This is my favourite concealer and my go to product on a daily basis. I really need to buy the full size product of this one.
This concealer as described by Benefit is industrial strength and it lives up to its name. It is more matte than the other two which I love as no one wants to looks shiny. This conceals the dark circles under the eyes flawlessly it looks very natural and matches my skin tone perfectly. This one is the best at covering blemishes and any red areas around the nose, as any discolouration instantly dissappears.
Cons: it does crease a little bit under the eye.

Fake Up: 3/5 - best at not creasing.

Pros: This has the prettiest packaging and is perfect for carrying around in your handbag for any daily touch ups.
Unlike the others it moisturises the skin as well as concealing what a nice bonus. The best thing about this concealer as unlike the other two it doesn't crease under the eye which is great!. Also the colour matches my skin tone better than the Erase Paste.
Cons: for me this doesn't give the best coverage it is like a mixture of the other two. It doesn't give as good coverage as Boi-ing but it does brighten a bit like the Erase Paste. It is definitely a good concealer and I would still recommend it but for me it isn't as good as the other two.

Please let me know what you think is the best concealer for you and why. I hope I have helped some undecided ladies which concealer to get who are pale like me.

How to get defined eyebrows with Benefit Brow Zings + Highbrow

As I have mentioned before I just used to pluck and occasionally get my eyebrows waxed to keep them nice and trim. Back then it was fashionable to have tiny thin eyebrows but now the bolder brow is back in fashion as we all know.

So to get beautiful brows you will need:
1. Tweezers
2. Eyebrow comb/brush
3. Eye brow styling kit such as Benefit Brow Zings containing eyebrow wax, powder and a angled make up brush.
4. Brow highlighter, I use the Benefit High Brow stick.
5. Cotton buds and makeup remover.

Step one - Get Plucky So I tweezer my brows almost daily to keep them looking the shape I want. If you want a new shape I would recommend going to a brow bar and to let the professionals do it.

Step Two - Brush Before applying any make up to the brows it is important to brush them to keep them looking neat and to make sure all the hairs are facing the correct way. Also after tweezing this removes any stray hairs that have been left behind.

Step Three - wax & powder With my Brow Zings kit I first of all users the hard angled brush that comes with it and sweep it in the wax and then the powder and tap off any excess.
Starting from the inner corner outwards I apply at a slight upwards angle up to where I want the arch to be.
I sweep it around to form the arch that I want and then angle it from there outwards for the last flick. For more definition I use some more product sweeping the same brush held horizontal and fill in any sparse parts of the brow in little sweeps going along the brow imitating hairs. This helps to keep the brow looking natural.

Step four - more powder After this I use the powder brush that comes with my kit and sweep it in the powder only again tapping off any excess.
I start from the inner corner again a little bit more inwards than last time letting my brow take the shape of the brush which is the perfect size to start off your eyebrow.
I sweep up to the arch and then again changed the brush angle to get the narrower small last bit of brow which is angled inwards towards my eye.

Step five - wipe away any mistakes I then use a cotton bud dipped in makeup remover to clean up my brow lines and keep them looking sharp.

Step six - highlight I then use the Benefit High Brow stick to apply a small amount of product all the way under the eyebrows, then gently smudge it along with my finger blending it together. This is my new must have products as it makes loads of difference to your face. It lifts your eyebrows up and makes them look great.

Step seven - practise makes perfect it has taken me quite a few months to get the hang of this and if I have missed doing it for a few days I feel a bit rusty again so get practising and soon you will be able to do it with your eyes closed, well maybe not but you get the idea.

Also if you are looking for a guide how to shape your eyebrows to suit your face then check out Benefits eyebrow mapping guide here as I found this really helpful.

I also plan to do a YouTube video demonstration on this soon as it is hard to explain so please look out for it ladies x

Friday, 31 May 2013

My skincare routine with Benefit B. Right range

After trying out some of Benefit travel size skincare products I decided to get some of them full size to use everyday. Here is my daily skincare routine.

Sometimes I do this routine morning and night sometimes it's just at night time only. This depends on how much make up I've been wearing the day before as I can use make up remover on my eyes, wash my face use make up remover again, sleep and I still have panda eyes when I wake up. The Benefit They're Real mascara is relentless to get off.

Anyway step one: I use a Nivea gentle make up remover blotted onto cotton pads and then I use this to remove any eye makeup.

Step two: I wash my face with the Benefit cleansing facial wash. I absolutely adore this as it smells so fresh and amazing. It's simple and foams very quickly you don't need to use much. A full size tube has lasted me about 5 months. Dry with towel. I picked this face wash over the facial scrub as I found that too rough for daily use as I prefer this gentle wash.

Step three: repeat step one as my eyes are resembling panda ones at this point.

Step four: Benefit toner. I splash a bit of this on my face and if I've used too much I dab the excess off with a cotton pad. It usually soaks in nicely though. This stuff feels really smooth. I'm not sure what it does but my face always feels so much cleaner after using this.

Step five: it's potent, this little pot of wonder by Benefit is one of my favourites. It's nice and delicate and I use this around my eye area. It helps to keep the area looking naturally bright and smooth.

Step six: finally I use the Benefit Total Moisture cream on my face and neck. Compared to all the other moisturisers I've tried this is my favourite as it soaks In immediately it's like my skin is drinking this stuff down. Also it isn't greasy and it smells great. As I've mentioned in a previous post that since I have been using this skincare range I have been complemented on my 'glowing complexation'. This moisturiser won hands down over Benefits triple emulsion cream as I found that greasy and it didn't soak in very well.

Overall I love this skincare collection and I will be gutted when it is discontinued as it is perfect for my skin. So I would recommend trying out the different sample products out there before committing to a pricey full size one.

Benefit Ultra Plush Lipgloss - Kiss You

Hi

I was lucky enough to get this lip gloss for free by winning a Facebook competition. It was called the Colour Me competition for the launch of the new Benefit Colour collection which includes powder and creme shadows and lip glosses in lots of beautiful shades. I won the Ultra Plush lip gloss in the shade Kiss You.
It came in the most gorgeous packaging as everything Benefit does. The packaging is art deco inspired and it looks great before I've even tried it out on my lips.

My first glance at the purple tube and i thought oh no its too dark. But after trying the colour out I was pleasantly surprised that it goes on a candy pinky purple colour which isn't too dark for my pale completion at all.
Because of the colour of the bottle and swatch photo on the website I would never even try out a tester of this colour if it was in front of me in store as I would automatically assume that it would be too dark but it has really opened my eyes to try shades that I usually wouldn't touch.

A pet hate for me and my husband is sticky lip glosses, you don't want your hair and face getting into a sticky mess with one gust of wind and my husband refuses to kiss me with lip gloss on in the past as it was sticky. Fear no more ladies this lip gloss has a new no sticky formula and I can vouch for it. It is lovely and soft and smooth and most importantly not sticky. This shades gives my face a lovely pop of colour as I like the rest of my make up to be quite neutral. The colour is also great for daytime and work as it isn't too bright I would say it is just bright for daytime glamour.
Thank you Benefit for my lip gloss I will definitely get my wear out of it.